|
|
|
Working with Nu-Coder Graphical User Interface
Nu-Coder 3.0 provides easy to use and highly intuitive Graphical User Interface. Working with Nu-Coder's GUI you can first setup Projects for encoding and configure and use Nu-Coder to encode the files of your Projects.
Nu-Coder 3.0 Tool Bar consists of 5 buttons providing the following actions:
- New - start new project
- Open - open existing encoding project
- Save - save current encoding project
- Scan - collect the information about function names and their use for Advanced obfuscation. Corresponding Command Line Option is -scan.
- Encode - encode the files in the current Project tree using the options specified in Encoder tab.
- Quit - quit and close Nu-Coder
- Help - display this manual
Project Tab
Project tab of Nu-Coder is used to setup new or open existing Projects. It consists of Files and Project tree groups. The figure below shows the user Interface provided on the Nu-Coder:
Files
Files group has 4 fields.
- Project - Currently loaded Project. If you are working on new project this field displays <New Project> until the project is saved.
- Root Directory - used to specify the root of the directories of your project. Nu-Coder will automatically select all files under Root Directory and it's subdirectories (recursively), include them in the project and display in Project tree
- Hide Directories - used to specify which directories to exclude from encoding, e.g. .svn directories are typically excluded, or images etc.
- File Extensions - used to specify the extensions of the files that need to be encoded
Project tree
Project tree group displays current directory tree of the Project
Logs
The logs generated by the encoder are displayed at the bottom of the Project Tab. Log entries contain names of the files, errors (if any) and the results. Errors are displayed in red and regular information in green colors
Encoder tab
The Encoder tab available in Nu-Coder is used to specify the options used for the encoding of Project files with Nu-Coder. The figure below shows the user Interface provided on the Encoder Tab:
Destination and Options tabs are used to specify how to encode your files with Nu-Coder. Nu-Coder also features sophisticated Command Line Interface described further in this manual
Destination tab
Specify where to place the encoded files of the Project.
- In designated directory tree. Select it to place encoded files in another directory. You will need to specify the target directory along with this option
- In-place, with appended extension. Select it to keep the encoded files in the same place with the source files but append the extension as specified in the input filed
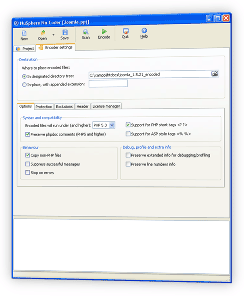
Encoder: Options Tab
 |

|
Specify the options for encoding of your Project files.
You can specify the options for encoding of your Project files using the Options of Encoder tab:
- Select the version of PHP to encode the scripts for in Encode files will run under (and higher) drop down box. PHP as a language is constantly developed. The way various syntax constructs behave changes from one version to another. For example, foreach() processes references differently in different minor versions of php 5.x. If your Project depends on such constructs, you should select the version of PHP supporting these features. Otherwise, you should select the earliest version of PHP compatible with your scripts
- Check Preserve extended info for debugging/profiling to Keep extended information for debugger/profiler
- Check Preserve line numbers info to preserve line numbers information in the encoded script
- Check Preserve phpdoc comments to keep php-doc comments, useful for reflection. This option is only applicable for PHP5 and higher versions of PHP.
- Check Copy non-PHP files to copy non-php files into designated directory tree. This option is only available if you select In designated directory tree option in Destination options.
- Check Stop on errors if you want the encoding to stop if Nu-Coder encounters an error in the script - i.e. syntax error. For example, keyword public will not be recognized on the versions of PHP 4.4
- Check Suppress successful messages if you don't want the encoding messages to show up in Log tab of Nu-Coder. These messages are only available with In designated directory tree and In-place, with appended extension Destination options
- Check Support for PHP short tags <? ?> to enable the support of short tags in encoding
- Check Support for ASP Style tags <% %> to enable the support of ASP style tags in encoding
Please note that these and other options are also available in Nu-Coder Command Line Interface
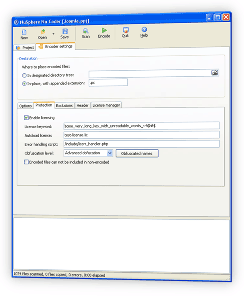
Encoder: Protection Tab
 |

|
- To enable the protection by the PHP License Manager functionality for the Project you need to Check Enable licensing check box on Protection Tab of the Encoder interface.
- Enter license keyword used for generation of the license file by PHP License Manager
- In Autoload license field specify license to be loaded when the encoded scripts are running
- Specify the script to be called for Error Handling in Error handling script
- You can set obfuscation level in Obfuscation level field.
- Basic Obfuscation means that only the names of all local variables will be replaced with generated ones
- Advanced obfuscation means replacement of function names and also allowing the user to choose the names to obfuscate by using the form displayed when the user selects Obfuscate Names button
- Encoded files can not be included in non-encoded - encoded files can be either refered to by URL directly - e.g. index.php, or included in the files, which are also encoded. This option makes reverse-engineering much harder.
Note: if the file is protected by license, it can only be included in the files protected by the same license. However, if the file is not under license protection, it can be included in any encoded script
Encoder: Exclusions Tab
Sometimes you would like to exclude certain files in the directory from encoding or you might need to exclude certain PHP files from license protection (for example to handle the error due to invalid license there). Here we explain the user interface used to exclude files from encoding and/or PHP License Manager available in nu-Coder. You can find additional information about Nu-Coder in PhpED here.
How to exclude PHP Files from encoding or licensing
- Check Do not encode files below check box and hit the Add button to enter specify the file masks you would like to exclude from encoding
- Use Do not enforce licensing field to specify the files to be excluded from the licenses protection
Encoder: Header Tab
You can use this tab to specify the header to be created in your encoded files
- Select one of the Standard Headers if you want the user to receive the warning if PhpExpress is not loaded
- Select No header if you donwant any header to be created
- Select Custom header if you want your own text to be used for the header and type in your text to the text area below the dropdown.
Encoder: License manager Tab
Nu-Coder - NuSphere's PHP Encoder - provides additional level of protection for PHP files with. You can generate trial, demo and commercial licenses for your PHP application with Command Line Interface and Graphical User Interface to License Manager. You can create Licenses for encoded PHP files on the most platforms, including of course Windows and Linux. Additional information about License Manager and Nu-Coder is available here.
How to create license files required for execution of encoded PHP files
- Select Create new license button at the bottom of the License manager tab. License properties dialog will appear
- Specify keyword for creation of the license (the same keyword will need to be used for encoding as described in Protection tab tutorial
- Check Valid Thru check box to specify the expiration date for the license
- Check Custom Header to enter the content of the custom header for the license.
- Check appropriate checkboxes in the Lock area to link the licenses to Host ID, MAC, IP or vhost (virtual host) as described in this manual
- Use Attributes field to specify the attributes in the license file and whether to expose them as described in API section of PHP Encoder Manual
You can generate and store newly created license by clicking Generate button at the bottom of the dialog
|
|
|
|